
Shrubs
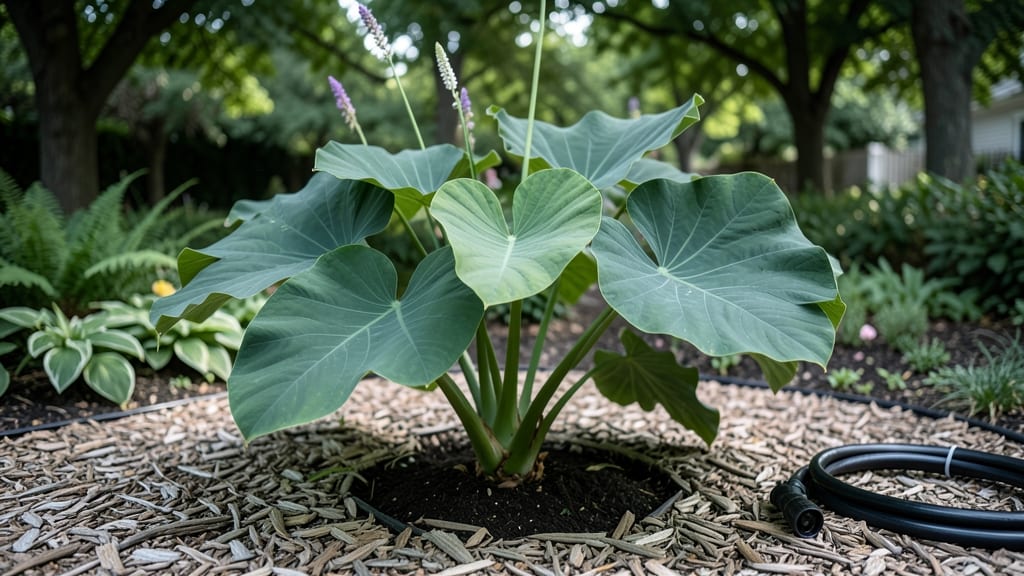
Elephant ears thrive where most plants refuse to grow—deep shade gardens where sunlight barely touches the soil. 🌿 I've grown these bold beauties under towering oaks and alongside brick walls, and they've never once complained about the lack of light.
The secret lies in understanding their natural habitat: damp, rich soil and indirect light that mimics their tropical origins. You'll need well-draining but moisture-retentive soil—think of it as a mix between garden soil and compost, with a handful of perlite to keep roots happy.
Watering is key: these plants love their soil damp but never soggy. A mulch layer helps maintain moisture and keeps roots cool, which is especially important in hot climates where shade gardens can still get warm.
What you end up with is stunning foliage that rivals any sun-loving plant—velvety leaves in shades of green, purple, or even black. The drama comes when they unfurl their massive leaves in spring, creating a tropical oasis even in the shadiest corner.
They grow 3-5 feet tall (some varieties reach 6 feet!) and spread just as wide, making them perfect for focal points. Pair them with hostas, ferns, or astilbes for a layered shade garden that feels lush and intentional.
The combination of elephant ears' bold structure with delicate foliage creates contrast that's impossible to ignore. Here's how to keep them thriving in your own deep shade spot.
📚 In This Guide
- What you need
- Instructions
- Tips and common mistakes
- Wrapping up and next steps
What you need
- ● Elephant ear plants (Colocasia spp.) – Choose 3–5 mature tubers (or 6–10 young plants) for full coverage. Varieties like Colocasia 'Black Magic' or 'Illustris' work beautifully for deep shade.
- ● Well-draining potting mix or garden soil – 5–10 gallons per plant (amend with compost for richer soil).
- ● Organic mulch – 2–3 inches of shredded bark or wood chips to retain moisture and suppress weeds.
- ● Slow-release fertilizer – A balanced 10-10-10 or organic option (like fish emulsion) to kickstart growth.
- ● Watering can or hose with a gentle spray nozzle – Elephant ears love moisture but hate soggy roots!
- ● Garden trowel or shovel – For planting tubers or dividing clumps.
- ● Gloves – Protect your hands from soil and sharp tuber edges.
- ● Measuring tape or ruler – To space plants 2–3 feet apart for optimal airflow.
- ○ Optional: Garden stakes or trellis – If your variety grows tall (e.g., 'Fred'), support may prevent flopping.
- ● Decorative stones or edging – Adds a polished look to your shade garden.
- ● Drip irrigation system – Automates watering for low-maintenance drama.
- ● Companion plants – Pair with ferns, hostas, or impatiens for layered shade.
How to grow stunning elephant ears in shady spots
These bold beauties thrive where others fail—here's how to coax their towering drama into your deep shade garden.
🌱 Step 1: Choose the Right Variety for Deep Shadow
Not all elephant ears tolerate shade equally. Look for Alocasia or Colocasia varieties like 'Maui Magic' or 'Black Stem'—they handle partial to full shade better than sun-loving types. These plants grow from tubers rather than seeds, so you'll want to source healthy, firm tubers from a reputable nursery. I always check for smooth, unblemished skin—any soft spots or mold mean the tuber's been damaged and won't thrive.
Here's the thing—elephant ears need space. Even in shade, mature plants can reach 5-6 feet tall with leaves spanning 2-3 feet wide. For four plants, plan on 4-5 feet between each to prevent crowding. If your shade is dense (like under large trees), you can space them closer—3 feet apart—but expect slightly smaller leaves.
☀️ Step 2: Prepare the Planting Site for Low-Light Growth
Elephant ears in shade need rich, moist soil that drains well but doesn't dry out. Amend your existing soil with 3-4 inches of compost and a handful of slow-release fertilizer (like 10-10-10) per planting hole. I like to mix in a little perlite—about 1 part perlite to 3 parts soil—to keep roots from sitting in soggy conditions, even in shade.
Dig holes twice as wide as the tuber but only 2 inches deep. Place the tuber with the bud-side (small bump) facing up—this is where the first shoots will emerge. If your shade is dappled (some sun filtering through), position the tubers slightly deeper (3 inches) to protect them from occasional heat spikes. Water the hole thoroughly before planting to help settle the soil around the tuber.
💧 Step 3: Water and Mulch for Consistent Moisture
Shade-loving elephant ears hate drying out, but they also drown in waterlogged soil. Water deeply once a week in most shade conditions, but adjust based on your soil's drainage. Stick your finger 2 inches into the soil—if it feels dry, water again. If it's still damp, wait another day. Overwatering in shade can lead to root rot, which kills plants quickly.
Spread 3-4 inches of mulch (like shredded bark or leaves) around each plant, keeping it 2 inches away from the stem. This mulch layer retains moisture while also regulating soil temperature—critical in shade where ground temps fluctuate less. Replenish mulch every 3-4 months as it breaks down. I also add a thin layer of worm castings in spring to give plants a gentle nutrient boost without burning their roots.
✂️ Step 4: Protect and Prune for Shade-Specific Challenges
Shade can make elephant ears more susceptible to slugs and snails—their soft leaves are a buffet. Set out beer traps (a shallow dish of beer) or use iron phosphate bait near plants. I also sprinkle diatomaceous earth around the base (but not on leaves—it can irritate them). Watch for chewed edges on leaves; if you see them, act fast before the pests move inward.
Deadhead spent leaves in late fall by cutting them back to ground level. This prevents energy drain from decaying foliage and keeps the plant tidy. In early spring, trim any yellow or damaged leaves to encourage new growth. Never cut into the tuber itself—you'll risk exposing it to rot. If your shade is very deep, you might see fewer leaves than in sun, but don't panic—this is normal. Focus on keeping the central growth point healthy.
🪴 Step 5: Overwinter Tubers for Next Year's Drama
When frost threatens, stop watering and let the leaves die back naturally. Once all foliage is brown, use a garden fork to carefully lift the tubers from the ground. Brush off excess soil and store them in a cool, dark place (like a garage) with 50-60% humidity. I wrap each tuber in newspaper and place them in a cardboard box with a little peat moss to keep them from drying out.
Check tubers monthly for rot or mold. If you see any, discard the tuber immediately—it won't survive another season. In early spring, before last frost, replant the tubers using the same method as before. They'll wake up slowly in shade, so don't rush—wait until you see new shoots (usually 4-6 weeks after planting) before resuming regular care. This patience pays off with bigger, healthier plants each year.
Tips & tricks for growing elephant ears in shade
Between us, growing elephant ears in shade takes a few smart tricks to make them truly thrive where others falter.
Variety Selection: The right tuber is everything. I've learned this the hard way after trying sun-loving varieties in shade—they just fade. Look for Alocasia or Colocasia types specifically bred for low light. The 'Maui Magic' variety, for instance, handles shade beautifully and still delivers those dramatic leaves. Pro tip: Buy tubers from a specialty nursery rather than big-box stores—they're more likely to be shade-adapted.
Planting Depth: In Step 2, when you're planting those tubers, pay attention to depth. The standard 2-inch planting works for most shade, but if you have dappled shade (like under tall trees with some sunlight filtering through), plant them 3 inches deep to protect the tubers from occasional heat spikes. This small adjustment prevents the tubers from drying out while still allowing shoots to emerge.
Moisture Balance: The once-a-week watering guideline in Step 3 is perfect for average shade, but here's what nobody tells you—your soil type matters more than the calendar. In clay-heavy soil, you might need to water every 5-6 days because it holds moisture longer. In sandy soil, you could water every 4 days. Always check that 2-inch soil test before watering again. Overwatering in shade is the #1 killer of elephant ears.
Winter Prep: When frost approaches, don't make my mistake of rushing to dig up tubers too early. Wait until all foliage is completely brown—this usually takes 2-3 weeks after the first frost. The tubers need to fully mature before storage. I also add a thin layer of straw mulch over the soil before frost as extra insulation. This simple step has saved my tubers from winter damage multiple times.
Pro Tips for Elephant Ears Shade
- Between us, growing elephant ears in shade takes a few smart tricks to make them truly thrive where others falter.
- Variety Selection: The right tuber is everything.
- Planting Depth: In Step 2, when you're planting those tubers, pay attention to depth.
Frequently asked questions
Got questions about using elephant ears shade (Colocasia) to transform your garden into a lush, shadowy retreat?
You’re not alone! Here are answers to the most common queries—from planting tips to troubleshooting—so you can dive in with confidence.
How fast do elephant ears grow, and when will they provide full shade?
Elephant ears are fast growers—expect 1–2 feet of height per season! For full shade (60–80% coverage), plant them in clusters and give them 2–3 years. In their first year, they’ll offer partial shade, but by summer, their broad leaves will cast deep shadows. Pro tip: Combine with taller plants (like bamboo or tree ferns) for layered shade sooner.
Can elephant ears survive in full sun, or do they really need shade?
While they tolerate morning sun, full sun will scorch their leaves and stunt growth. Ideal spots are dappled shade (under trees) or partial shade (4–6 hours of filtered light). For full-sun gardens, opt for Alocasia or Caladiums—they’re shade-loving cousins with similar drama!
How do I keep elephant ears from dying back in winter?
These tropical beauties are not frost-hardy, but you can extend their life! In cold climates (below 20°F), dig up tubers in fall, store them in dry peat moss, and replant in spring. For milder zones (Zone 7+), mulch heavily with straw or leaves to insulate roots. Warning: Overwatering in winter = rot. Let soil dry slightly between waterings.
Are there dwarf varieties for smaller gardens or containers?
Skip the giants with these space-saving picks:
- ‘Black Stem’ (2–3 ft tall) – Striking purple stems, great for pots.
- ‘Pink China’ (3 ft) – Compact and cold-hardy (Zone 6).
- ‘Illustris’ (3–4 ft) – Classic variegation, thrives in containers.
For true dwarf options, try Colocasia ‘Feeling Blue’ (1.5–2 ft). Just ensure containers have drainage holes and winter protection!
Why are my elephant ears’ leaves turning yellow or brown?
Yellow/brown leaves usually signal one of three issues:
- Too much sun – Relocate to shade or add a sheer curtain.
- Overwatering – Let soil dry 1–2 inches deep between waterings.
- Fungal issues – Prune affected leaves, improve airflow, and avoid wetting foliage.
Pro tip: Fertilize lightly (balanced 10-10-10) in spring to boost vibrancy. Too much nitrogen = leggy, weak plants.
Can I grow elephant ears in containers, and what’s the best soil mix?
Yes! They thrive in pots (15+ gallons for mature plants). Use a mix of:
- 60% peat moss or coconut coir (retains moisture).
- 30% perlite or pumice (aeration).
- 10% compost or worm castings (nutrients).
Drainage is critical—add a layer of gravel at the bottom to prevent root rot. Move containers indoors (or to a garage) if temps drop below 40°F!
Wrapping up and next steps
Transforming your garden into a lush, dramatic retreat with elephant ears shade is easier than you think! These bold plants bring height, texture, and deep shadow—perfect for creating a serene, tropical vibe. Whether you’re a seasoned gardener or just starting, their low-maintenance charm makes them a dream addition.
Ready to dive in? Start small—pick a sunny spot, gather your supplies, and plant with confidence. Before you know it, your garden will be a stunning, shady oasis that turns heads (and provides the perfect respite from the sun!). 🌿✨